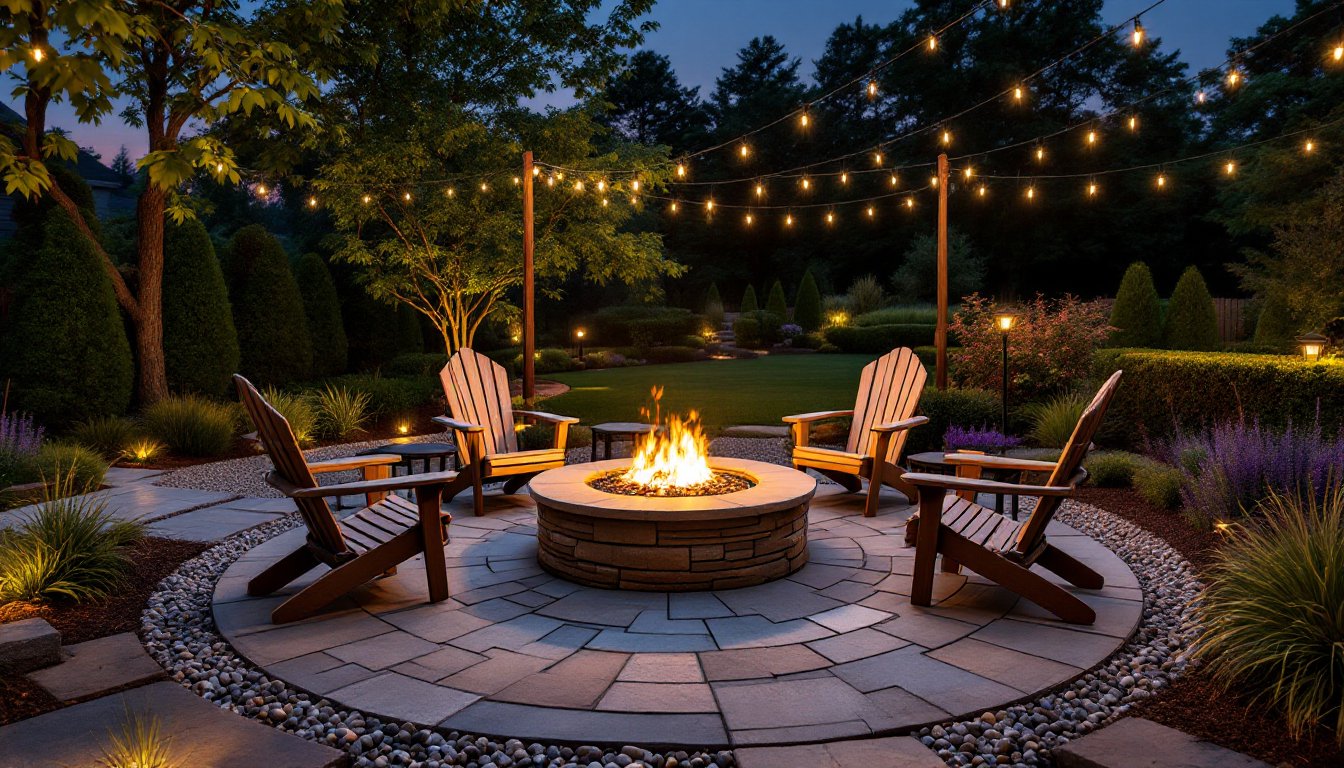
A fire pit can turn an underutilized backyard into a four-season gathering spot, if it’s planned right. Too many homeowners drop a metal bowl on a patch of gravel and wonder why the space feels disconnected. The difference between a fire pit that looks like an afterthought and one that anchors the yard comes down to intentional landscaping: the right hardscape base, complementary plantings, comfortable seating zones, and lighting that extends usability past sunset. Whether starting from scratch or retrofitting an existing patio, these design strategies will help integrate a fire feature that looks built-in, not dropped off.
Table of Contents
ToggleKey Takeaways
- Backyard landscaping ideas with fire pit success depends on intentional design—choose the right pit style (in-ground, built-in, or portable) based on your yard size, local codes, and commitment level.
- Create a functional seating zone 6–8 feet from the fire pit with proper furniture heights: 14–16 inches for conversation seating and 18 inches for dining, arranged to keep smoke away from guests.
- Select fire-resistant hardscape materials (flagstone, concrete pavers, or decomposed granite) extending at least 10 feet from the pit, and keep plantings at 6 feet minimum distance using low-flammability species like boxwood and lavender.
- Layer your lighting with low-voltage path lights, uplighting on trees, and string lights to extend usability after dark without competing with the fire’s glow.
- Install proper safety features including a spark arrestor screen, fire extinguisher within 10 feet, and noncombustible zones to prevent ignition hazards and comply with local fire codes.
Choosing the Right Fire Pit Style for Your Backyard
Fire pit selection drives the rest of the landscape plan. In-ground fire pits work well on properties with natural grade changes or where a sunken conversation area makes sense. They require excavation, drainage planning, and often a concrete footing, this isn’t a weekend project. Expect to dig 12–18 inches deep and line the pit with firebrick rated for direct flame contact.
Above-ground built-in fire pits using natural stone, concrete block, or firebrick offer more flexibility. A typical DIY kit uses 36-inch diameter steel ring inserts surrounded by mortared stone veneer. These require a 4-inch concrete pad base extending at least 12 inches beyond the pit perimeter. Check local codes, many jurisdictions require a permit for permanent fire features and mandate minimum distances from structures (usually 10–25 feet).
Portable fire pits, steel, cast iron, or copper bowls, need the least commitment but still demand a noncombustible base. A 6×6-foot pad of flagstone, concrete pavers, or decomposed granite prevents scorching and provides a visual anchor. For yards with limited space or renters testing the waters, portables make sense. Just don’t skip the base: grass and wood decking are fire hazards.
Gas-fueled pits (natural gas or propane) eliminate ash cleanup and offer instant ignition, but require a gas line run (hire a licensed plumber for natural gas) or tank storage. Wood-burning pits deliver authentic crackle and aroma but generate sparks, install a mesh screen and keep a fire extinguisher or garden hose within 10 feet.
Creating Cozy Seating Areas Around Your Fire Pit
Seating layout matters more than the chairs themselves. A circular or square arrangement 6–8 feet from the fire rim provides warmth without smoke in the face. For a 48-inch diameter fire pit, plan for a 12–14 foot overall footprint including seating. That’s tight for a small yard: consider a smaller 36-inch pit if space is limited.
Built-in stone or concrete benches offer permanence and extra seating for larger groups. Cap them with 2-inch thick bluestone or concrete treads: these stay cooler than solid masonry and provide a finished edge. Add outdoor cushions only if they’re stored between uses, leave them out and they’ll mildew by June. Curve the bench wall to follow the fire pit’s geometry: a radius of 6–8 feet feels intimate without crowding.
Movable seating (Adirondack chairs, metal rockers, teak benches) gives flexibility for different group sizes. Go with chairs that can handle weather exposure and are properly placed around hardscaped areas for stability. Avoid resin furniture near fire pits, it warps above 150°F, which is easily reached 4–5 feet from open flame.
Consider conversation-height versus dining-height seating. Standard Adirondack chairs sit 14–16 inches off the ground: pair them with low side tables (12–18 inches) for drinks. If combining the fire pit with an outdoor dining setup, use 18-inch seat heights and a 28–30 inch table. Don’t try to split the difference, mismatched heights feel awkward.
Landscaping Elements That Complement Fire Pits
The material and planting choices around a fire pit determine whether it reads as intentional or improvised.
Patio Materials and Hardscaping Options
Flagstone (1–2 inches thick) laid on a 4-inch compacted gravel base offers an irregular, natural look. Joints can be mortared or filled with polymeric sand: mortar is more permanent but cracks if the base settles. Budget $15–$25 per square foot installed, depending on stone type and region.
Concrete pavers (2⅜ inches thick) in 12×12 or 6×9 inch sizes install faster and cost less, $8–$15 per square foot. They won’t crack like poured concrete and are easier to level. Use edge restraints (aluminum or plastic paver edging) to prevent creep. Tumbled or textured pavers look less suburban than smooth-faced ones.
Poured concrete (minimum 4 inches thick with wire mesh or rebar) works for modern or minimalist designs. Broom-finish for traction or stamp it to mimic stone. Expect $6–$12 per square foot for basic finish: decorative stamps and stains add $3–$8 per square foot. Concrete requires control joints every 8–10 feet to manage cracking.
Decomposed granite or crushed gravel (⅜-inch minus) offers a permeable, budget option at $3–$6 per square foot installed. Compact it over landscape fabric: edge it with steel or timber to contain migration. It’s not ideal for high-traffic entries but works well for casual fire pit zones. Adding small rocks for base layers improves drainage and stability.
Whatever base material is chosen, extend it at least 10 feet in all directions from the fire pit edge. This creates a defined zone, prevents tripping hazards, and keeps embers off flammable mulch or dry grass.
Plants and Greenery for Fire Pit Zones
Keep plantings outside the immediate heat radius, 6 feet minimum, and choose low-flammability species. Avoid ornamental grasses, junipers, and other plants with high resin or oil content: they’re essentially kindling. According to professional landscapers, proper plant placement around fire features prevents both fire hazards and maintenance headaches.
Evergreen shrubs like boxwood, holly, or Japanese pieris provide year-round structure and stay green through winter when deciduous plants go dormant. Plant them in groups of 3–5 for massed effect rather than dotting them around.
Perennials with low water content, sedum, lavender, salvia, catmint, tolerate heat better than moisture-loving hostas or ferns. They also won’t wilt if sparks land nearby. For gardenia landscaping ideas in warmer zones, keep those fragrant blooms well outside the fire radius.
Groundcovers like creeping thyme, sedum, or vinca can soften the edges where hardscape meets lawn. They handle light foot traffic and won’t fuel a fire like mulch. Avoid using shredded bark mulch within 10 feet of the pit: use river rock or pea gravel (¾-inch diameter) as a fire-resistant mulch alternative.
Container plants offer mobility. Use ceramic, concrete, or metal pots, never plastic or fiberglass near fire. Plant drought-tolerant species (succulents, agave, ornamental peppers) that won’t suffer if they get too warm.
Lighting and Ambiance Tips for Fire Pit Areas
A fire pit provides flickering light, but it’s not enough for safety or ambiance once people move away from the circle. Layered lighting makes the space usable after dark and highlights the landscaping.
Low-voltage path lights (12V LED) along walkways prevent tripping. Space them every 6–8 feet and aim for 3–5 watts per fixture: more than that and they’ll overpower the fire pit glow. Install them on the path edges, not centered, it creates a runway effect otherwise. Run the transformer inside or in a weatherproof box: most handle up to 200–300 watts total load.
Uplighting on nearby trees or shrubs adds depth. Use MR16 LED spotlights (3–7 watts) at the tree base, aimed upward to graze bark texture. Warm white (2700K–3000K) color temperature mimics firelight: avoid cool white LEDs, which feel sterile. Many designs inspired by outdoor evening environments balance natural fire glow with subtle electric lighting.
String lights (Edison bulbs or mini LEDs) strung overhead on poles, pergola beams, or between trees soften the space. Use outdoor-rated cords and keep them at least 8–10 feet above the fire pit to avoid heat damage. Commercial-grade strings with S14 or ST40 bulbs on 18-inch spacing last longer than holiday lights.
Solar lights work in a pinch but output is limited (typically 1–2 lumens each). They’re fine for accent but won’t provide functional light. If the site has power, low-voltage wired systems are more reliable.
Dimmer switches or smart controls let occupants adjust brightness as the evening progresses. Start brighter during setup and dining: dim down once the fire takes over. The idea is to enhance landscape lighting without competing with the flames.
Safety Considerations and Layout Planning
Backyard fire features are regulated for good reason. Before breaking ground, check with the local building department on setback requirements, maximum pit size, and permit needs. Some municipalities prohibit wood-burning pits entirely or restrict use during fire bans.
Clearance distances vary by jurisdiction, but 15–25 feet from structures (house, garage, shed, fence) is common. Overhanging tree branches should be trimmed to at least 10 feet above the fire. Don’t site a pit under a covered patio or pergola unless it’s specifically designed for vented gas fire and complies with code.
Wind patterns matter. Observe which direction prevailing winds blow smoke and site seating upwind whenever possible. A solid masonry or stone wall on the downwind side acts as a windbreak and reflects heat back toward seating. For yards with limited side-yard space, placing the fire pit in a more open area reduces smoke issues.
Spark arrestor screens are essential for wood-burning pits. Use heavy-gauge steel mesh, not flimsy aluminum: it needs to handle hot embers. Keep the screen on whenever the fire is burning and unsupervised kids or pets are around.
Fire extinguisher or water source must be within 10 feet. A charged garden hose or a 5-pound ABC extinguisher works. Don’t rely on a bucket of sand, it’s ineffective on most fires.
Noncombustible zone: At minimum, use a 10-foot radius of stone, concrete, gravel, or bare soil around the pit. Mulch, dry grass, wood chips, and decking are all ignition risks. If the fire pit sits on a wood deck (not recommended, but sometimes done with strict precautions), install a propane or natural gas unit only, and use a fireproof mat rated for high heat underneath.
Seating layout should allow easy exit in all directions, don’t box people in with built-in benches that create a dead end. Leave 36-inch-wide paths between seating clusters.
Smoke management: Wood-burning pits produce smoke, period. Seasoned hardwood (oak, maple, ash) burns cleaner than softwood (pine, fir). Keep logs to 3–4 inches diameter: larger logs smolder and smoke. Never burn treated lumber, painted wood, or trash.
If the property is in a wildfire-prone area (California, Colorado, Pacific Northwest), follow Firewise landscaping principles: greater clearance, fire-resistant plants, and consider a gas-fueled pit instead of wood.