
Split level homes deliver efficiency and distinctive character, but they can be tricky when it comes to landscaping. Those staggered rooflines and multi-level facades often create visual confusion from the curb, with disconnected planting beds and awkward transitions. The good news? With some strategic planning and targeted upgrades, homeowners can turn those challenges into design assets. This guide walks through proven techniques, from foundation planting to tiered beds, walkways to lighting, that unify the architecture and boost curb appeal without very costly.
Table of Contents
ToggleKey Takeaways
- Split level landscaping curb appeal improves dramatically with strategic foundation planting that uses varied heights and repeating species to unify the home’s multi-level facade.
- Tiered garden beds naturally echo split level architecture, manage slope, and create visual flow that guides the eye from lawn to roofline while adding dimension and purpose.
- Widening walkways to 4–5 feet and adding a landing or patio at the entry clarifies circulation, eliminates visitor confusion, and anchors the front elevation visually.
- Strategic landscape lighting using uplighting, path lights, and accent fixtures transforms curb appeal after dark by emphasizing texture, architectural details, and the home’s vertical layers.
- Native plants, drip irrigation, generous mulching, and hydrozoning create low-maintenance landscaping that reduces upkeep without sacrificing curb appeal or requiring weekly labor.
Why Split Level Homes Present Unique Landscaping Challenges
Split level architecture staggers living spaces vertically, typically with front entries on a mid-level and living areas half a flight up or down. From the street, this creates multiple rooflines, varied window heights, and an asymmetrical profile that’s harder to anchor visually than a traditional ranch or two-story colonial.
The most common landscaping challenges include awkward foundation walls of differing heights, competing focal points, and blank facade expanses that lack architectural features. Many split levels were built in the 1960s–70s with minimal landscaping, so overgrown foundation shrubs or bare mulch beds compound the problem.
Slope and drainage add another layer. Because split levels often sit on sloped lots, water runoff, erosion, and uneven grade changes require thoughtful planting and hardscape design. Ignoring these factors leads to soggy beds, undermined walkways, and wasted plant investments.
Finally, the offset entry and stair access mean walkways need careful placement. A poorly defined path or landing area confuses visitors and dilutes curb appeal. Addressing these issues upfront, before purchasing a single plant, saves time, money, and frustration down the line.
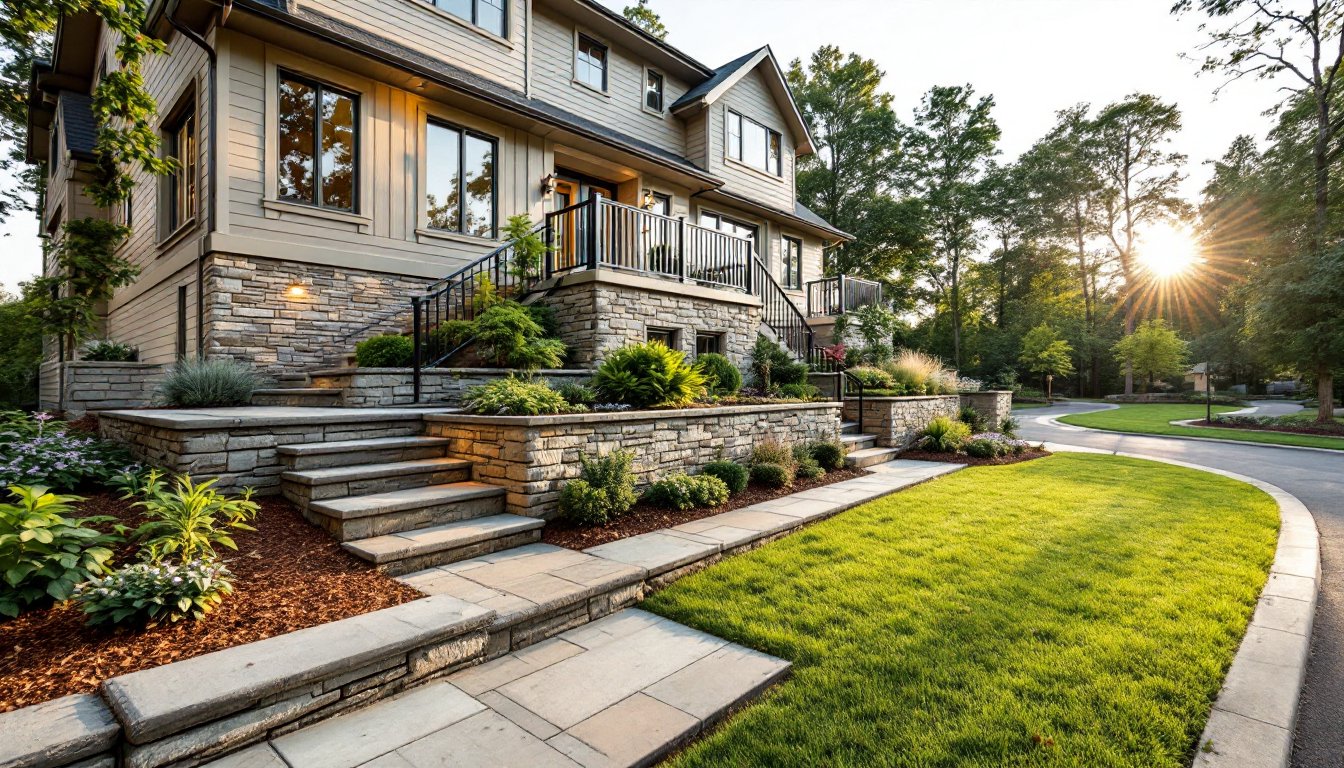
Strategic Foundation Planting for Multi-Level Facades
Foundation plantings serve two jobs: soften hard edges and tie the home to the ground. On a split level, that means treating each facade level as its own zone while maintaining a cohesive palette.
Choose plants scaled to the architecture. For taller sections (typically 8–12 feet), use evergreen shrubs like boxwood (Buxus), yew (Taxus), or holly (Ilex) in the 4–6 foot mature range. Avoid junipers that grow unpredictably or dwarf Alberta spruces that brown out in full sun. For lower sections, opt for compact varieties, dwarf spireas, potentilla, or ornamental grasses like dwarf fountain grass (Pennisetum alopecuroides ‘Hameln’), that won’t block windows or crawl up siding.
Layer vertically. Place taller shrubs at corners and transitions, mid-height plants along walls, and low perennials or groundcovers at the bed edge. This creates depth and draws the eye horizontally, counteracting the home’s vertical chop.
Repeat key species. Using the same plant in multiple beds, say, three groups of boxwood flanking the entry and garage, creates rhythm and unity. Vary the groupings (odd numbers look more natural) but keep the palette tight: three to five species max for a cohesive look.
Mind the foundation perimeter and drainage. Leave at least 12–18 inches between plantings and siding to allow airflow and prevent moisture damage. If the home has a basement or crawlspace, ensure beds slope away at a 2% grade (roughly 1/4 inch per foot) to direct water from the foundation. Amend heavy clay soil with compost to improve infiltration and root health.
Creating Visual Flow with Tiered Garden Beds
Tiered beds are a natural fit for split level homes, echoing the architecture while managing slope and adding dimension. Done right, they guide the eye upward and create intentional planting zones: done poorly, they look like terraced farm plots.
Use low retaining walls or edging to define tiers. Natural stone, concrete block, or pressure-treated timbers (6×6 or 4×6) work well. For walls under 2 feet tall, most jurisdictions don’t require engineering or permits, but confirm local codes if you’re building higher. Dry-stacked stone offers a rustic look and good drainage: mortared stone or block provides clean lines and stability on steeper grades.
Stagger the tiers to mirror the home’s levels. If the front entry is mid-height, place one tier at grade, a second 18–24 inches up flanking the entry, and a third along the upper roofline. This draws a visual line from lawn to ridgeline, unifying the facade.
Plant each tier with purpose. The lowest tier handles groundcovers and perennials, creeping phlox, sedum, daylilies, that spill over edges. Mid tiers hold shrubs and ornamental grasses. The top tier, if space allows, can accommodate small specimen trees like Japanese maple (Acer palmatum) or serviceberry (Amelanchier), which add vertical interest without overwhelming the structure.
Install landscape fabric and edging before backfilling. Landscape fabric (not plastic sheeting) suppresses weeds while allowing water infiltration. Overlap seams by 6 inches and secure with landscape staples. Backfill with a 50/50 mix of native soil and compost, then top with 2–3 inches of mulch, shredded hardwood or pine bark, not dyed rubber. Mulch conserves moisture, moderates soil temperature, and gives a finished look.
Consider irrigation. Sloped beds dry out faster. If you’re not ready for an in-ground system, run soaker hoses on a timer, one zone per tier. Drip irrigation is more efficient but requires upfront planning. Either way, water deeply once or twice a week rather than daily sprinkling.
Walkway and Entryway Upgrades That Make an Impact
A well-defined walkway signals “this is the front door” and eliminates guesswork for guests. On split levels, where entries can be tucked or offset, clarity is everything.
Widen the main walkway. Standard 3-foot walks feel cramped: aim for 4–5 feet to accommodate two people side-by-side and create a sense of welcome. Concrete, pavers, flagstone, or stamped concrete all work, choose materials that complement the home’s style and your budget. Pavers offer flexibility for curves and repairs: poured concrete is cost-effective but cracks over time in freeze-thaw climates.
Add a landing or small patio at the entry. A 6×6-foot or 8×8-foot landing provides space to pause, set down packages, or greet visitors. It also balances the front elevation visually, anchoring the entry. Frame it with potted plants, a bench, or decorative lighting.
Edge walkways with low plantings or lighting. Liriope, mondo grass, or candytuft soften hard edges and prevent grass encroachment. Low-voltage path lights (see next section) make the route visible after dark and add a polished touch.
Address stairs and railings. Many split levels have a short flight leading to the entry. If existing railings are rusted or wobbly, replace them with powder-coated aluminum or composite options that resist weathering. Check local codes: most require railings for stairs with more than three risers. Ensure tread depth is at least 10 inches and riser height is uniform (typically 7–7.75 inches per IRC standards). Non-slip treads or textured surfaces are smart additions in wet climates.
Connect secondary paths. If the garage or driveway is offset, add a secondary path that links to the main walk without cutting across lawn. This prevents worn grass trails and reinforces intentional circulation. For inspiration on cohesive front yard layouts, look to designs that prioritize clear sightlines and logical flow.
Lighting Solutions to Highlight Architectural Layers
Landscape lighting transforms curb appeal after dark, emphasizing layers and depth that daylight can miss. On split levels, strategic lighting mitigates the visual chop and highlights positive features.
Use uplighting to graze walls and accent focal points. Place LED spotlights (3–5 watts each) at the base of the home to wash light up the facade. This emphasizes texture, stone veneer, siding profiles, and visually lifts the roofline. Aim fixtures at corners, chimneys, or architectural details rather than flooding the entire front.
Install path lights along walkways and stairs. Low-voltage LED path lights (1.5–3 watts) spaced every 6–8 feet provide safe navigation and define edges. Choose fixtures with shielded bulbs or downward-facing heads to avoid glare. Many systems run on a transformer (typically 12V) plugged into a GFCI-protected outlet: wire gauge matters, use 12 AWG for runs over 50 feet to prevent voltage drop.
Highlight specimen plants or trees. A single uplight at the base of a Japanese maple or ornamental grass creates dramatic shadows and draws the eye upward, complementing the home’s verticality. Avoid over-lighting: two or three well-placed accents beat a dozen scattered fixtures.
Add entry and landing lighting. Wall sconces flanking the door provide ambient light and frame the entry. Choose fixtures rated for wet locations (UL listing) and match the style to your home, modern, transitional, or traditional. Pair them with a motion sensor or photocell timer for convenience and security.
Consider smart controls. Wi-Fi-enabled transformers or hubs let homeowners adjust brightness, set schedules, or turn lights on remotely. This adds flexibility for seasonal changes or special events without rewiring. Many modern landscaping approaches integrate lighting early in the design phase for seamless installation.
Safety note: All outdoor electrical work should meet NEC (National Electrical Code) standards. If you’re not comfortable running wire or connecting to household circuits, hire a licensed electrician. Low-voltage systems are DIY-friendly, but line-voltage (120V) fixtures require permits and code compliance in most jurisdictions.
Low-Maintenance Landscaping Ideas for Busy Homeowners
Not everyone has weekends free for pruning and deadheading. Low-maintenance landscaping prioritizes native plants, mulch, and smart design to reduce upkeep without sacrificing curb appeal.
Choose native and adaptive species. Plants suited to local climate and soil require less water, fertilizer, and pest control. For example, in the Northeast, switchgrass (Panicum virgatum), black-eyed Susan (Rudbeckia), and serviceberry thrive with minimal input. In the Southeast, muhly grass (Muhlenbergia capillaris) and beautyberry (Callicarpa americana) are reliable. Consult regional planting guides on Gardenista or your local extension office for vetted lists.
Install drip irrigation or soaker hoses. Hand-watering is time-intensive and inconsistent. A drip system on a timer delivers water directly to root zones, cutting waste and weeding chores. Budget $200–400 for a DIY kit covering a typical front yard: add a rain sensor to skip watering after storms.
Mulch generously and refresh annually. A 3-inch layer of shredded hardwood or pine bark suppresses weeds, retains moisture, and breaks down to enrich soil. Top-dress each spring to maintain depth, mulch settles and decomposes over time. Avoid piling mulch against plant stems or tree trunks (“mulch volcanoes”), which invites rot and pests.
Limit turf area. Grass demands mowing, edging, fertilizing, and watering. Replace high-maintenance lawn sections with groundcovers, mulched beds, or hardscape. Creeping thyme, clover, or periwinkle (Vinca minor) provide green coverage with less fuss. For small front yards, reducing turf to a central strip flanked by beds maximizes impact and minimizes labor.
Group plants by water needs. This practice, called hydrozoning, ensures you’re not overwatering drought-tolerant species or underwatering thirsty ones. Place water-lovers near the house or downspout outlets: put xeric plants (succulents, ornamental grasses, lavender) in drier zones. The Spruce offers detailed hydrozoning guides and plant compatibility charts.
Use perennials over annuals. Annuals deliver season-long color but require replanting each year. Perennials return annually with less effort. Choose varieties with extended bloom (e.g., coneflower, salvia, daylily) and stagger bloom times for multi-season interest. Divide clumps every 3–4 years to maintain vigor, it’s a one-afternoon project that multiplies your stock for free.
PPE reminder: Wear gloves, eye protection, and long sleeves when planting, mulching, or handling amendments. Some mulches harbor splinters: compost and soil can carry bacteria or fungi. A dust mask is smart when spreading dry amendments or cutting pressure-treated lumber.
Conclusion
Split level homes reward thoughtful landscaping with dramatic curb appeal and improved functionality. By addressing the unique challenges, varying facade heights, slopes, and entry placement, homeowners can create cohesive, low-maintenance designs that highlight architectural strengths. Start with foundation plantings and tiered beds to anchor the structure, then layer in walkways, lighting, and native plants for year-round interest. The result? A front yard that feels intentional, welcoming, and ready for 2026.